CSS is a complex language that packs quite a bit of power. We know that CSS, or Cascading Styles Sheets, is a way to style and present HTML. Whereas the HTML is the meaning or content, the style sheet is the presentation of that document.
All styles cascade from the top of a style sheet to the bottom, allowing different styles to be added or overwritten as the style sheet progresses. We already know that CSS is a vast thing, so, I’ll discuss some important rules. Such as,
- Class and Id selectors
- Grouping and Nesting
- Pseudo Classes
- Shorthand Properties
- Background Images
- Page Layout
Class and Id selectors
In the CSS, a class selector is a name preceded by a full stop (“.”) and an ID selector is a name preceded by a hash character (“#”).


The difference between an ID and a class is that an ID can be used to identify one element, whereas a class can be used to identify more than one.
Grouping and Nesting
You can give the same properties to a number of selectors without having to repeat them.


You can simply separate selectors with commas in one line and apply the same properties.
Nesting
If the CSS is structured well, there shouldn’t be a need to use many class or ID selectors. This is because you can specify properties to selectors within other selectors.

Shorthand Properties
Some CSS properties allow a string of values, replacing the need for a number of properties. These are represented by values separated by spaces.
Margins and Padding
Margin allows you to amalgamate margin-top, margin-right, margin-bottom,
and margin-left in the form of property: top right bottom left;


Borders
Border-width can be used in the same way as margin and padding, too. You can also combine border-width, border-color, and border-style with the border property.

![]()
Background image
CSS background images are a powerful way to add detailed presentation to a page.
![]()


Page Layout
Layout with CSS is easy. You just take a chunk of your page and shove it wherever you choose. You can place these chunks absolutely or relative to another chunk.
The position property is used to define whether a box is absolute, relative, static or fixed
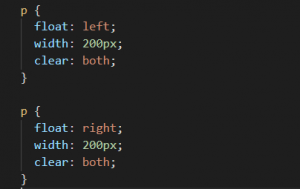
Floating a box will shift it to the right or left of a line, with surrounding content flowing around it.
Floating is normally used to shift around smaller chunks within a page, such as pushing a navigation link to the right of a container, but it can also be used with bigger chunks, such as navigation columns. Using float, you can float: left or float: right.
Positioning
The position property is used to define whether a box is absolute, relative, static or fixed:
- static is the default value and renders a box in the normal order of things, as they appear in the HTML.
- relative is much like static but the box can be offset from its original position with the properties top, right, bottom and left.
- absolute pulls a box out of the normal flow of the HTML and delivers it to a world all of its own. In this crazy little world, the absolute box can be placed anywhere on the page using top, right, bottom and left.
- fixed behaves like absolute, but it will absolutely position a box in reference to the browser window as opposed to the web page, so fixed boxes should stay exactly where they are on the screen even when the page is scrolled.
How a box’s position is calculated

A box can be positioned with the top, right, bottom, and left properties. These will have different effects depending on the value of position.
relative: Position is offset from the initial position.
absolute: Taken out of the flow and positioned in relation to the containing box.
fixed: Taken out of the flow and positioned in relation to the viewport. It will not scroll with the rest of the page’s content.
Floating
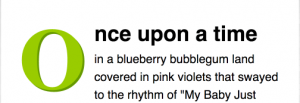
Floating a box will shift it to the right or left of a line, with surrounding content flowing around it.
Floating is normally used to shift around smaller chunks within a page, such as pushing a navigation link to the right of a container, but it can also be used with bigger chunks, such as navigation columns.
Using float, we can use float: left or float: right
Example:
Rounded Corners
Rounded corners used to be the stuff of constricting solid background images or, for flexible boxes, numerous background images, one per-corner, slapped on multiple nested div elements.
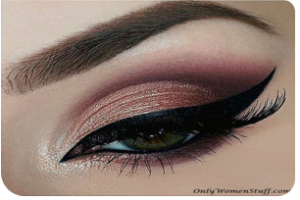
Border radius?
Border radius. Fear not, though — don’t have to have borders. The border-radius property can be used to add a corner to each corner of a box.
Before After


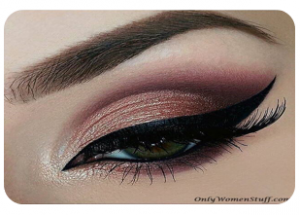
Example: different type of borders –radius measurements

Box Shadows

- The first value is the horizontal offset — how far the shadow is nudged to the right (or left if it’s negative)
- The second value is the vertical offset — how far the shadow is nudged downwards (or upwards if it’s negative)
- The third value is the blur radius — the higher the value the less sharp the shadow. (“0” being absolutely sharp). This is optional — omitting it is equivalent of setting “0”.
- The fourth value is the spread distance — the higher the value, the larger the shadow (“0” being the inherited size of the box). This is also optional — omitting it is equivalent of setting “0”.
- The fifth value is a color. That’s optional, too.


Targeting media types
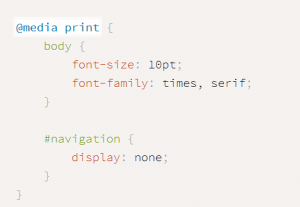
@media can be used to apply styles to a specific media, such as print.
Embedding fonts
It is now widely used as a technique for embedding fonts in a web page

Reference
HTML Basics
HTML (Hypertext Markup Language) is the most basic building block of the Web. It defines the meaning and structure of web content.HTML are generally used to describe a web page’s appearance/presentation (CSS) or functionality/behavior (JavaScript).
“Hypertext” refers to links that connect web pages to one another, either within a single website or between websites. Links are a fundamental aspect of the Web.
A Simple HTML Document
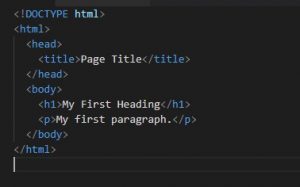
HTML uses “markup” to annotate text, images, and other content for display in a Web browser. HTML markup includes special “elements” such as <head>, <title>, <body>, <header>, <footer>, <article>, <section>, <p>, <div>, <span>, <img>, <aside>, <audio>, <canvas>, <datalist>, <details>, <embed>, <nav>, <output>, <progress>,
<video> and many others.
HTML Elements
An HTML element usually consists of a start tag and an end tag, with the content inserted in between

- The opening tag:This consists of the name of the element (in this case, p), wrapped in opening and closing angle brackets. This states where the element begins or starts to take effect — in this case where the paragraph begins.
- The closing tag:This is the same as the opening tag, except that it includes a forward slash before the element name. This states where the element ends — in this case where the paragraph ends. Failing to add a closing tag is one of the standard beginner errors and can lead to strange results.
- The content:This is the content of the element, which in this case, is just text.
- The element:The opening tag, the closing tag and the content together comprise the element.
HTML Attributes
Attributes provide additional information about HTML elements.

Attributes contain extra information about the element that you don’t want to appear in the actual content. Here, class is the attribute name and editor-note is the attribute value. The class attribute allows you to give the element an identifier that can be used later to target the element with style information and other things.
Nested HTML Elements
HTML elements can be nested (elements can contain elements).
All HTML documents consist of nested HTML elements.
This example contains four HTML elements:

In the example above, we opened the <p> element first, then the <strong> element; therefore, we have to close the <strong> element first, then the <p> element.
HTML Empty Elements
HTML elements with no content are called empty elements.
<br> is an empty element without a closing tag (the <br> tag defines a line break):
![]()
This contains two attributes, but there is no closing </img> tag and no inner content. This is because an image element doesn’t wrap content to affect it. Its purpose is to embed an image in the HTML page in the place it appears.
Anatomy of an HTML Document

- <!DOCTYPE html>— the doctype. It is required preamble. In the mists of time, when HTML was young (around 1991/92), doctypes were meant to act as links to a set of rules that the HTML page had to follow to be considered good HTML, which could mean automatic error checking and other useful things. However these days, they don’t do much, and are basically just needed to make sure your document behaves correctly. That’s all you need to know for now.
- <html></html>— the <html> This element wraps all the content on the entire page and is sometimes known as the root element.
- <head></head>— the <head> This element acts as a container for all the stuff you want to include on the HTML page that isn’t the content you are showing to your page’s viewers. This includes things like keywords and a page description that you want to appear in search results, CSS to style our content, character set declarations and more.
- <meta charset=”utf-8″>— This element sets the character set your document should use to UTF-8 which includes most characters from the vast majority of written languages. Essentially, it can now handle any textual content you might put on it. There is no reason not to set this and it can help avoid some problems later on.
- <title></title>— the <title> This sets the title of your page, which is the title that appears in the browser tab the page is loaded in. It is also used to describe the page when you bookmark/favourite it.
- <body></body>— the <body> This contains all the content that you want to show to web users when they visit your page, whether that’s text, images, videos, games, playable audio tracks or whatever else.
Lists
Marking up lists always consist of at least 2 elements. Lists are two types
- Ordered list
- Unordered list
Ordered List
Ordered list are for lists where the order of the items does matter, such as a recipe. These are wrapped in an <ol> element.

Unordered List
Unordered lists are for lists where the order of the items doesn’t matter, such as a shopping list. These are wrapped in a <ul> element.

Links
Links are very important — they are what makes the web a web!
HTML links are hyperlinks.
You can click on a link and jump to another document.
When you move the mouse over a link, the mouse arrow will turn into a little hand.
To add a link, we need to use a simple element — <a> — “a” being the short form for “anchor”.

We also fill in the value of this attribute with the web address that you want the link to link to:
![]()
Reference Links:
- https://developer.mozilla.org/en-US/docs/Web/HTML
- https://www.w3schools.com/html/default.asp
- https://en.wikipedia.org/wiki/HTML
CSS Basics
Cascading Stylesheets — or CSS is used to style it and lay it out. For example, you can use CSS to alter the font, color, size, and spacing of your content, split it into multiple columns, or add animations and other decorative features.
Web browsers apply CSS rules to a document to affect how they are displayed. A CSS rule is formed from:
- A set of properties, which have values set to update how the HTML content is displayed.
- A selector, which selectsthe element(s) we want to apply the updated property values to.
At its most basic level, CSS consists of two building blocks:
- Properties: Human-readable identifiers that indicate which stylistic features (e.g., font, width, background color) you want to change.
- Values: Each specified property is given a value, which indicates how you want to change those stylistic features (e.g., what you want to change the font, width, or background color to.)
CSS is case-sensitive so be careful with your capitalization. CSS has been adopted by all major browsers and allows you to control:
- color
- fonts
- positioning
- spacing
- sizing
- decorations
- transitions
How to Use CSS?
There are three main ways to apply CSS styling. You can apply inline styles directly to HTML elements with the style-attribute. Alternatively, you can place CSS rules within style-tags in an HTML document. Finally, you can write CSS rules in an external style sheet, then reference that file in the HTML document. Even though the first two options have their use cases, most developers prefer external style sheets because they keep the styles separate from the HTML elements. This improves the readability and reusability of your code. The idea behind CSS is that you can use a selector to target an HTML element in the DOM (Document Object Model) and then apply a variety of attributes to that element to change the way it is displayed on the page.
External Style Sheet
With an external style sheet, we can change the look of an entire website by changing just one file!
Each page must include a reference to the external style sheet file inside the <link> element. The <link> element goes inside the <head> section:
![]()
Example:


Inline style sheet
An inline style may be used to apply a unique style for a single element.
Example:


Internal style sheet
An internal style sheet may be used if one single page has a unique style.
Example:


CSS Selector
In CSS, selectors are used to target the HTML elements on our web pages that we want to style
There are three types of selectors:
- ID Selectors
- Class Selectors
- Groping Selectors
ID Selectors
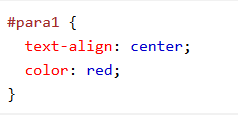
- The id selector uses the id attribute of an HTML element to select a specific element.
- The id of an element should be unique within a page, so the id selector is used to select one unique element!
![]()

Class Selectors
- The class selector selects elements with a specific class attribute.
To select elements with a specific class, write a period (.) character, followed by the name of the class.
![]()


Grouping Selectors
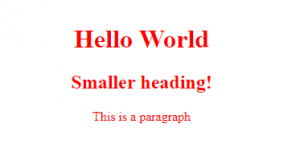
If we have elements with the same style definitions, like this:

It will be better to group the selectors, to minimize the code.
To group selectors, separate each selector with a comma.


Reference
- https://developer.mozilla.org/en-US/docs/Learn/CSS/Introduction_to_CSS/Selectors
- https://learn.freecodecamp.org/responsive-web-design/basic-css/
- https://www.w3schools.com/css/default.asp


