

First we have to understand what Pixel Art is. A Pixel Art is a form of digital art, created through the use of software, where images are edited on the pixel level.
Figure: A pixel art
To draw a picture in a pixel art editor we need a dynamic set of drawing tools and controls. The controls are the interface elements that appear below the picture.
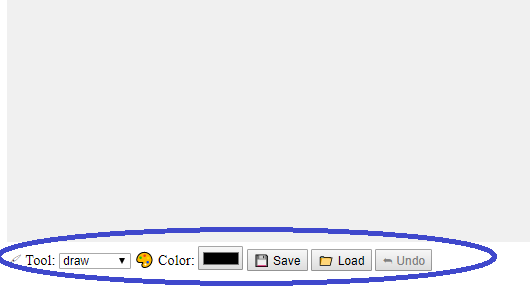
The controls will be provided as an array of components constructors. Other the other hand Drawing Tools are things like drawing pixels or filling in an area. The application shows the set of available tools as a <select> field.
The article contents:
· Tool Select
· Color Select
· Drawing Tools
o Draw
o Rectangle
o Fill
o Pick
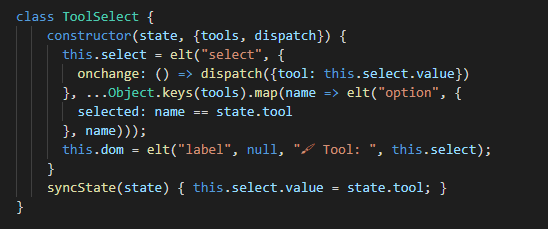
Tool Select: The first control is tool selection menu. It creates a <select> element with an option for each tool. By sets up a “change” event handler that updates the application state when we selects a different tool.

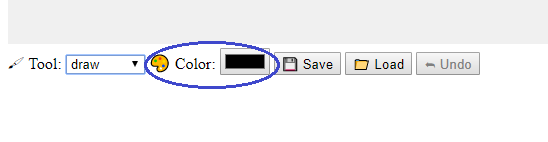
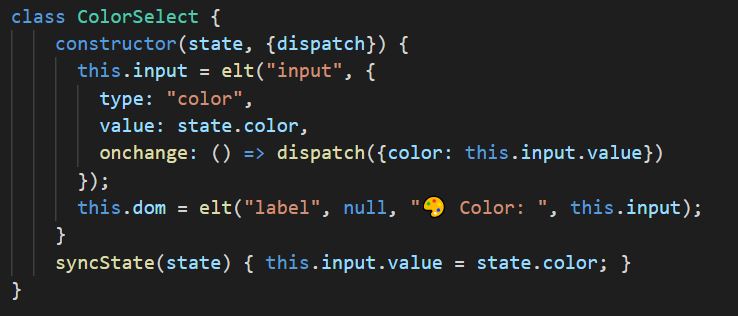
Color Select: An HTML <input> element with a type attribute of color gives us a form field that is specialised for selecting colors.


Drawing Tool: Draw
The most basic tool is draw tool. It changes any pixel that we click or tap to the currently selected color.

Drawing Tool: Rectangle
For Large shapes it can be useful to quickly create rectangles. The rectangle tool draws a rectangle between the point where we start dragging and the point that we drag to.


An important detail in this implementation is that when dragging, the rectangle is redrawn on the picture from the original state. That way, we can make the rectangle larger and smaller again while creating it, without the intermediate rectangles sticking around in the final picture. This is one of the reasons why immutable picture objects are useful.
Drawing Tool: Fill
The flood fill tool fills the pixel under the pointer and all adjacent pixels that have the same color.“Adjacent” means directly horizontally or vertically adjacent, not diagonally. This picture illustrates the set of pixels colored when the flood fill tool is used at the marked pixel:


Drawing Tool: Pick
The color picker tool allows us to point at a color in the picture to use it as the current drawing color.

‘A pixel art editor’ application will be a pixel drawing program, where one can modify a picture pixel by pixel by manipulating a zoomed-in view of it, shown as a grid of colored squares. One can use the program to open image files, drawing on them with mouse or other pointer device, and save them. An undo operation may be helpful also. That’s how it looks like-
![]()
This application has two portion. One is the canvas plot to draw the picture and the other is the different function panel below the canvas. But in this article, we will discuss about only how to create the canvas and draw on it with mouse.
THE STATE
We will go through state by state. The state contains the information of particular scenery of the application.
![]()
The application state will be an object with picture, tool, and color properties. The picture is itself an object that stores the width, height, and pixel content of the picture.
![]()
The pixels are stored in an array, in the same way as matrix row by row, from top to bottom. The draw method that expects an array of updated pixels—objects with x, y, and color properties—and creates a new picture with those pixels overwritten. This method uses slice without arguments to copy the entire pixel array—the start of the slice defaults to 0, and the end defaults to the array’s length.
Dom Building
We have the state and picture. Now we need to create our canvas. But we have to append the canvas in the document body using dom property. For knowledge about dom https://www.w3schools.com/js/js_htmldom.asp
![]()
The elt helper function provides a way to create an element and assigns property to domnode(not attributes) and child. This means we can’t use it to set arbitrary attributes, but we can use it to set properties whose value isn’t a string, such as ‘onclick’, which can be set to a function to register a click event handler.
Now, our dom building function is ready. We can start work for the canvas now.
THE Canvas
We said that, the first portion of the application is Canvas that displays the picture as a color of grid. It is responsible for two things: showing a picture & communicating mouse pointer event on picture. It doesn’t know how the application as a whole works. Rather, when responding to pointer events, it calls a callback function provided by the code that created it, which will handle the application-specific parts.If you need any knowledge about Canvas you can go through this https://www.w3schools.com/html/html5_canvas.asp.
![]()
We will draw the each pixel as 10 by 10 measurement as scale =10. The syncState method keeps track of its current picture and does a redraw only when syncState is given a new picture. Now let’s define the drawPicture mehod.
![]()
The drawing function sets the size(hight,width) of the canvas based on the scale and picture size and fills it with a series of squares, one for each pixel.
Now, what will happen when mouse pointer works on canavas? Lets do some stuff for that. When the left mouse button is pressed while the mouse is over the picture canvas, the component calls the pointerDown callback, giving it the position of the pixel that was clicked—in picture coordinates. This will be used to implement mouse interaction with the picture. The callback may return another callback function to be notified when the pointer is moved to a different pixel while the button is held down.
![]()
The PictureCanvas has additional method called mouse in it’s prototype. If you need to know what prototype is then you may read this article http://enlightsolution.com/uncategorized/prototypes-in-javascript/. Let’s define the pointerPosition method.
![]()
We can use getBoundingClientRect to find the position of the canvas on the screen, it is possible to go from mouse event coordinates (clientX and clientY) to picture coordinates. These are always rounded down so that they refer to a specific pixel. So we are getting the mouse position.
We said that we will not do all the functions here in the application. Our goal is to achieve this—
![]()
So, baseControls should be updated to baseControls=[ToolSelect,ColorSelect].
Now we’ll implement the main component (PixelEditor class) as a shell around a picture canvas and a dynamic set of tools and controls(Here just ToolSelect,ColorSelect) that we pass to its constructor.
![]()
The Control classes are—

Now we have to defind the draw tool that dispatches an action that updates the picture to a version in which the pointed-at pixel is given the currently selected color.

The draw function immediately calls the drawPixel function but then also returns it so that it is called again for newly touched pixels when the user drags or swipes over the picture.
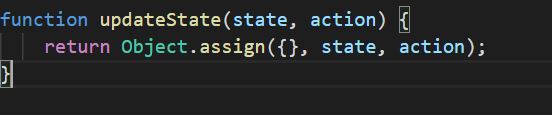
The updateState function can compute a new state. We’ll allow the interface to dispatch actions as objects whose properties overwrite the properties of the previous state.
Now we can test our application—
![]()
And here is our desire output—
![]()

Thats how the Canvas and drawing a picture works in Pixel Editor tool.
Happy Coding :)!!!!!!!!

Undo Action in Pixel art editor
In pixel art editor undo action is work for remove element which we art in the editor. Always it remove the recent element from the editor and update the image.
Why we need it?
Sometimes we may have some mistakes when we art in the editor. Also some unnecessary things may be drawn. So we have to remove those unnecessary things. That’s why undo action is needed. Undo action is an important feature in this editor.


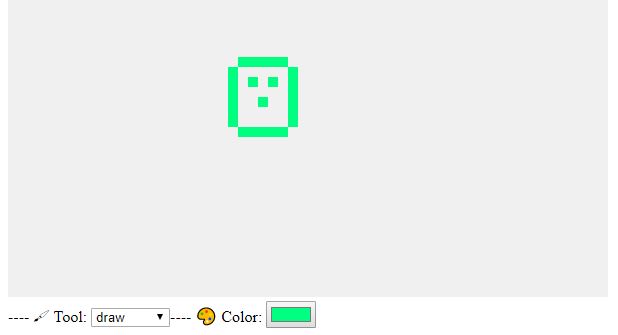
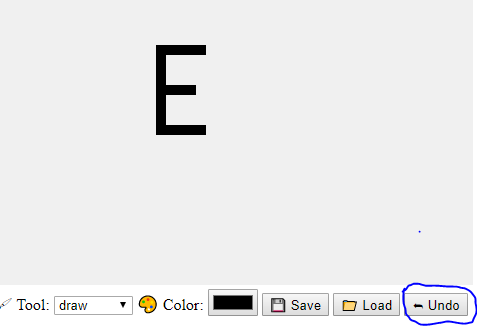
In picture1 and picture2 the mistakes or unnecessary elements are marked in a circle. We will use undo action to remove those.
How Undo works?
When we press the undo button the latest update is removed from the image. To find the latest update we need to save every update of the image. So we use an done array to save every update state. And to insert the image into the array we use a method historyupdatestate().
To remove the image this editor has an undo button to maintain it.
Firstly we the undo button to start undo action and then to update the picture a update State method is needed.
Undo button:
Undo button does not do everything. It just dispatch undo action when we click in undo button and disable itself when there is nothing to undo.
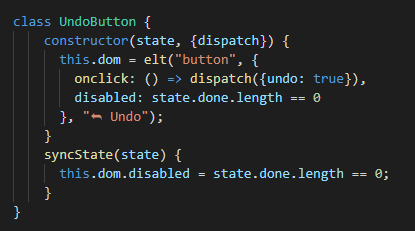
Here Undo action will be true on click the undo button.
State.done is an array of pictures which we draw in the editor. “State.done.lenght==0” define that there is no image in the array that means no picture is drawn in the editor so nothing to undo. So undo button will be disabled.

Here we can see that undo button is disable when nothing is drawn and enable after drawing.
Image Update:
To update image based on action a historyUpdateState() method is used. When the action is undo then it check in done array for image. If it is empty then no update works otherwise the latest image will be removed from the array.
When we draw anything in editor the image will be saved in first position of done array.

If the action is contain a new picture and last picture is saved more than 1000 milliseconds ago. It takes the new picture as done[0] (first element of the done array) and the previous elements(pictures) are kept from done[1]. And object.assign() update the state.
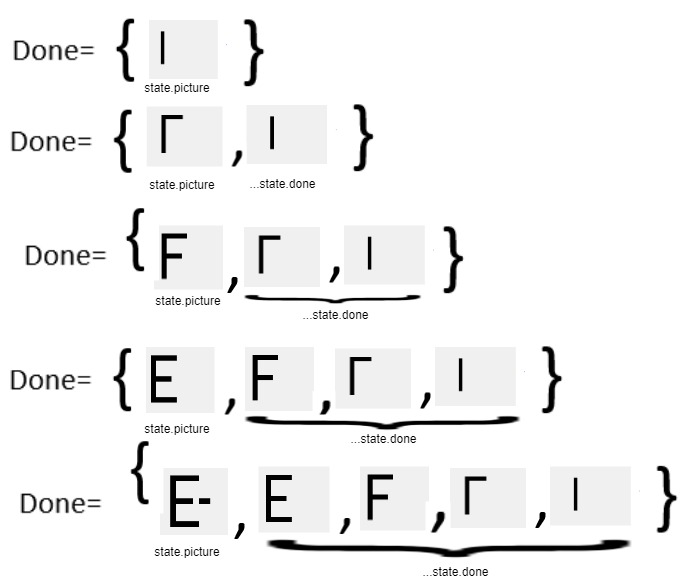
In historyUpdateState() functions when action is undo it takes the most recent picture as current picture and make doneAt to zero. And state.done.slice(1) extract the pictures from done array. It update the array elements by deleting done[0] element which contains the latest picture. Here Object.assign() is used to update the property of the state.

here the latest image has deleted after click undo button from done array.
After update the state it show the picture which is on the current state that is state.done[0].

Statement:
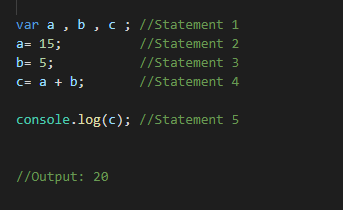
Most JavaScript programs contain JavaScript statements .The statements are executed, one by one in the same order as they are written. Example:
 JavaScript Variable:
Variable(Binding) means anything that can vary. JavaScript includes variables which hold the data value and it can be changed anytime. Example:
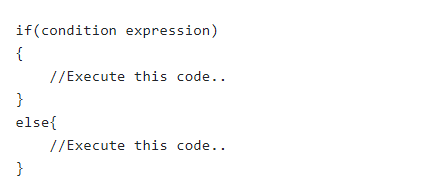
 Conditional Execution:
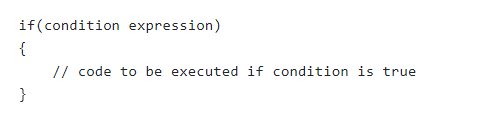
In JavaScript conditional execution is created with the if keyword. In simple case, we want some code to be executed if, and only if ,a certain condition holds.
JavaScript includes three forms of if condition:
- if condition,
- if else condition and
- else if condition.
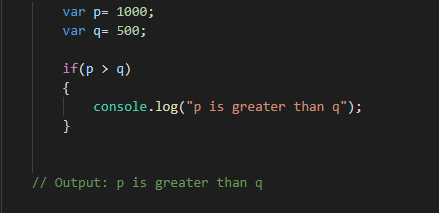
If condition:
Syntax:
 Example:
 if else condition:
Syntax:
 Example:
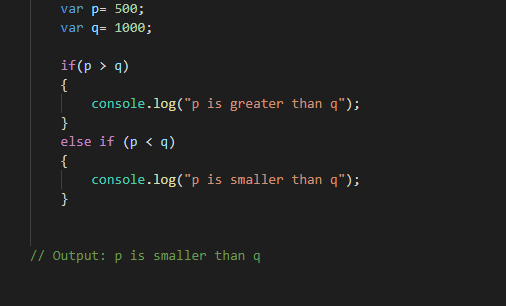
 else if condition:
Syntax:
 Example:
 While Loop:
Syntax:
 Example:

Do while loop:
Syntax:
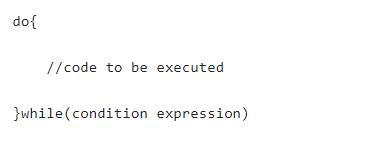
Example:
 For Loop:
Syntax:

Example:

Switch:
Syntax:

Example:


ECMAScript Modules:
JavaScript standard from 2015 introduces its own, different module system. It is usually called ES modules, where ES stands for ECMAScript. ECMAScript modules are the official standard format to package JavaScript code for reuse. Modules are defined using a variety of import and export statements.
ES Modules Syntax: The syntax to export and import. An HTML page can add a module by using a <script> tag with the special type=”module” or nomodule attribute:
![]()
Export:
The export statement is used when creating JavaScript modules to export functions, objects, class or primitive values from the module so they can be used by other programs with the import statement. Many way use export. Example:
Exporting individual features: Every functions, objects, class before use export.
Example: 
Export Default : There are two different types of export, named and default. We can have multiple named exports per module but only one default export per file. Each type corresponds to one of the above syntax:
Example: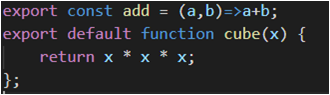
Export list: we can put export separately. Here we first declare, and then export.
Example: 
Renaming Exports: We can also use as to export under different names(change name).
Example: 
Import:
Import – The static import statement is used to import bindings which are exported by another module. Imported modules are in strict mode whether we declare them as such or not. Many way use import. Example:
Importing Named: We can have multiple named exports per module. Named exports are useful to export several values. During the import, it is mandatory to use the same name of the corresponding object.
Example: 
Importing Default: We can have only one default export per module. A default export can be imported with any name.
Example: 
Importing Default and Named: We can have only one default export per module. A default export can be imported with any name.
Example: 
Importing All: Import all of a module’s exports as a module object.
Example: 

‘Async & Await’ is the process that works to use “promise” in a more comfortable way. The advantage of “async & await ” is that it is easy to understand and use.
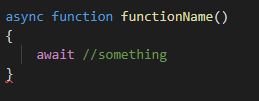
Async Function: Async function starts with async keyword.

Await: The keyword await makes JavaScript wait until that promise settles and returns its result.Let’s see an example how we can use async & await. Here is an array of customer object.
Now we will create a method to get the customer firstname using forEach loop. There is a function setTimeout() which is used to show time delay as a symbol of asynchronization.

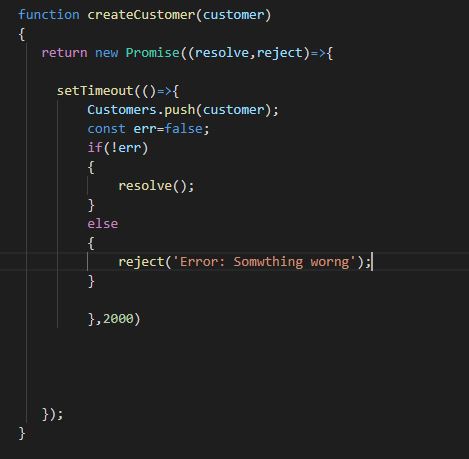
Here is another function that create customer and push to the array. The function works as a promise.
Now what will happen for the following code?

That’s the output. The third customer is’nt in the customer as it way delayed 2000 ms.
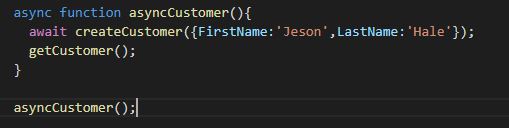
 Here we can solve this by async & await. We will make the getCustomer() function wait until createCustomer() has done it’s work.
Then everything works fine.

That’s how async & await works. Happy Coding!!!!

Asynchronous Programming
What is Asynchronous?
In general, asynchronous comes from Greek asyn-, meaning “not with,” and chronos, meaning “time” is an adjective describing objects or events that are not coordinated in time.
In computer programs, asynchronous operation means that a process operates independently of other processes, whereas synchronous operation means that the process runs only as a result of some other process being completed or handing off operation.
In a synchronous way the first operation is start first and complete its execution then the next operation is start after complete the first one. Next operation is blocked by the previous operation until complete it. But in asynchronous programming one task never wait for another task for execute. The task execute first which completed first. It never block one task input or output for another task.

JavaScript is an asynchronous programming language and java is a synchronous language.
Example 1: Synchronous programming java
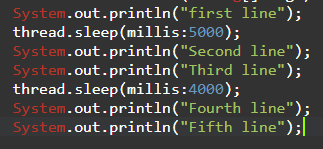
In this example after execute first line it will wait for 5 sec, then second and third line will be executed. Also wait 4 second after third line and execute fourth and fifth line.
Example 2: Asynchronous programming JavaScript.
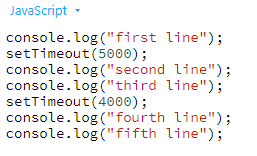
In this example using JavaScript no line wait for another line. Here second line does not wait for first line and forth line does not wait after third line. These all lines are execute at run time. No line blocked another line. That is non-blocking of asynchronous programming.
There are different way to implement Asynchronous in JavaScript.
- Callback function
- Promise
- Generators
- Async & Await
I will describe here about Callback function and Promise.
Callback function:
Callback function is a function that return or use another function as it’s parameter.
Callback is an easier way to describe asynchronous programming.
Example:

In this example setTimeout function uses another function to display second line. And this timeout function set 5 sec waiting time for second line and 4 sec for fourth line.
But in execution third and fifth line does not wait for second and fourth line. They are executed after first line. Then fourth line is executed before second line because second line needs more time.
Here second line need 5 sec . But it can’t block the execution of another line after it. So this is an non-blocking process and this process is defined by asynchronous.
Promise:
Promise is a build in object in JavaScript(ES6).
Promises are the way to deal with asynchronous programming without writing too many callback in function.
It is begin difficult to maintain the program when the chain of callback functions is so long to implement lots of asynchronous task. To solve this problem we can use promise. It is a clean way to implement asynchronous programming in JavaScript.
Promises give us a way to handle asynchronous processing in a synchronous way. They represent a value that we can handle at some point in the future. And, better than callbacks here, Promises give us guarantees about that future value, specifically:
- The promise is immutable: No other registered handlers of that value can change it.
- We are guaranteed to receive the value, regardless of when we register a handler for it, even if it’s already resolved.
For example:

Creating promise:
To create an object we can use class in ES6. We can also use a constructor with it. Constructor is used to give property values in object creation time. To deal with promise there are two methods. Then() and catch(). That works as chain
In this way a promise has three steps.
1.Pending: until a Promise is fulfilled it is in pending state
- Fulfillment: when the first handler is called the Promise is considered fulfilled with the value passed to that handler.
- Rejected: if the second handler is called, the Promise is considered rejected with the value passed to that handler.

The standard way to create a promise is to use new Promise construction with accept a handler that is given two function as parameter. The first handler is resolve and another is reject.
Example:

The then() method takes a function that will be passed the resolved value of the Promise when it is fulfilled. And the catch() method takes a single handler to be called when a promise is rejected.
Md. Hamidur Rahaman

What is ASP.NET SignalR:
ASP.NET SignalR is a library for ASP.NET developers to add real-time web functionality to their applications. Real-time web functionality is the ability to have server-side code push content to the connected clients as it happens, in real-time.
SignalR takes advantage of several transports, automatically selecting the best available transport given the client’s and server’s best available transport. SignalR takes advantage of WebSocket, an HTML5 API that enables bi-directional communication between the browser and server. SignalR will use WebSockets under the covers when it’s available, and gracefully fall back to other techniques and technologies when it isn’t, while the application code remains the same.
SignalR also provides a simple, high-level API for doing server-to-client RPC (call JavaScript functions in a client’s browser from server-side .NET code) in an ASP.NET application, as well as adding useful hooks for connection management, such as connect/disconnect events, grouping connections, authorization.

How to use ASP.NET SignalR In your Project:
Step 01: Create ASP.NET MVC Project First from Visual Studio.
Step 02: SignalR Developed with JQuery, so at first we need to add the latest JQuery in our project

Step 03: After installing JQuery, we need to add SignalR Library in our Project.
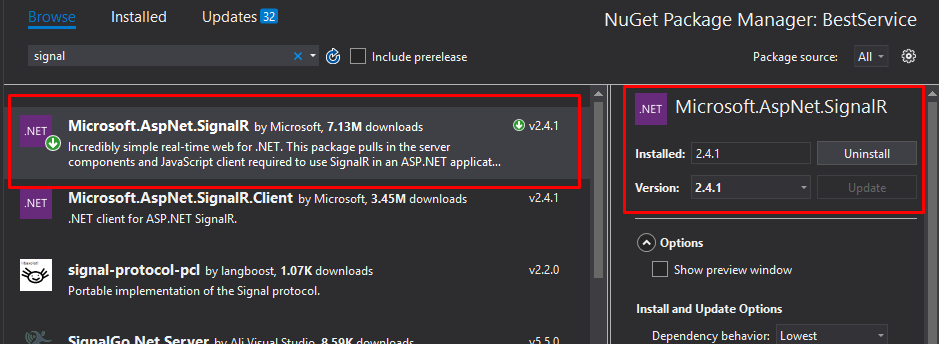
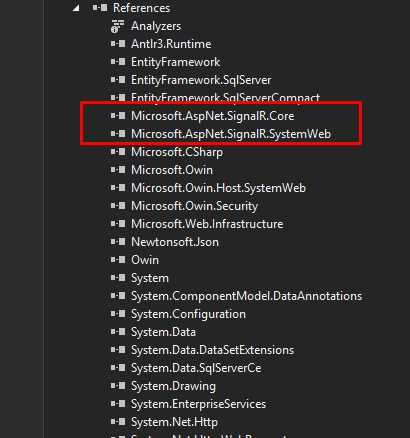
Note: After Install SignalR we will see those packages in out reference
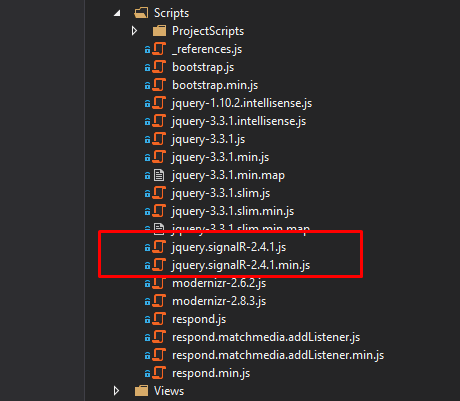
And also see those js files in the scripts section.
Step 04: Update Startup.cs Class

Step 05: Create HUB For Client-Server-Client Connection

Step 06: Update Customer Hub
In this Section we create a Method called CustomerBroadcast, we can create this by any name as we need, and we create an object of HubContext so that we can find all active clients from here and notify them data as well as when we need.
The last line of this method is very important, context.Clients.All.xxxx this (xxxx) this is the method that we will create in our front side and trigger from here when needed, but this method should be started with camel case.

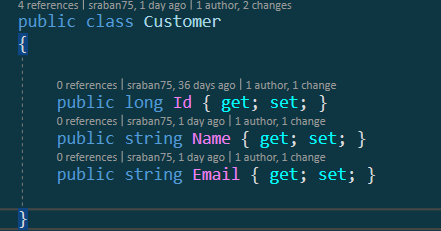
Step 07: Create Customer Model
Step 08: Add Db Context to Communicate with Database by Entity Framework, Add migration and Update Database as well

Step 09: Now we will create an Action (Insert) in Home Controller and Hub Method When Need to Broadcast to Clients. It could be Create/ update/ delete/ etc. and when this method is called, this will automatically invoke client-side function by Running SignalR Hub.js.


Step 10: Create View for Insert Action

Step 11: Create Index View for See Details, add SignalR js Reference from Scripts folder, then add Virtual path for hub connection, and then add our Customer.js File (we will add bellow)

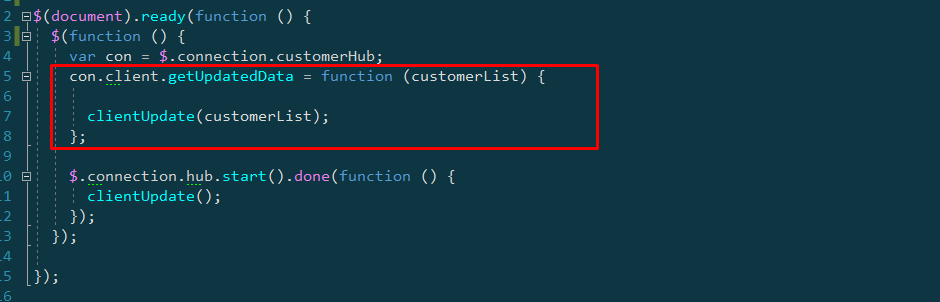
Step 12: Create a new js file for client update.

Note: When our Server side Method (ProjectHub.CustomerBroadcast()) is call from anywhere in our server side,
Then this con.client.getUpdatedData function also called from client side automatically, and we will get updated data.
Update Customer.js File like bellow.

That’s it, now run the application and Go to Insert page, fill up the form and submit.
in Index page, firstly hub.start function will call and we will see the data, but when any server-side data updates, all clients also updated as expected.
Final Output:
For testing, we have opened two browsers, one for insert and another one for See the Customer List. So when we Fill up the insert form and submit the form, all clients will receive those data that server pushed, and updates table by JQuery. so No need to refresh or make another server request, this is the beauty of ASP.NET SignalR. 🙂

Source GitLab: https://gitlab.com/Sraban75/signalrefcf.git
—————————— The End——————————
Closure:
A closure is a feature in JavaScript where an inner function has access to the outer (enclosing) function’s variables. Whenever a function is called, a new scope is created for that call. The local variable declared inside the function belongs to that scope; they can only be accessed from that function.
Example:
function add(n) {
var b = n;
function result(m) {
var a = m;
return a+b;
}
return result;
}
var x=add(2);
console.log(x(3));
Output: 5
Here we have two functions.
- add() creates a local variable called b and returns the result() function.
- The result() function is an inner function that is defined inside add() and is only available within the body of the add() function. Note that the result() function has local variable a.
However, since inner functions have access to the variables of outer functions, result() can access the variable b declared in the parent function, add(). If result() were to have its own b local variable, it would use this instead. The result() function return sum of the a and b value.
In our example, the result() function had preserved the value of b when the add() function was executed, and continued to preserve (closure) it.

Expressions and statements are the bread and butter of a program’s code structure. In this blog I try to explain the concept of expressions and statements.
Expressions are fragments of code that produces a new value as a result. For example it is similar to arithmetical operation. By arithmetical operations we can do addition or subtraction between two numbers or more to create a new number as the result. There is an easy way to spot expressions is to look for the operator sign in the code.
There are different types of expressions:
- Arithmetic Expressions :

Expressions that evaluate to a number
- String Expressions:

Expressions that evaluate to a string
- Array and Object Expressions:

These expressions return array or object data type
- Logical Expressions :

These expressions return Boolean data type
- Object Creation Expressions:These expressions return an object

- Object Property Expressions:

These expressions return an object property
- Function Definition Expressions:

These expressions return a function
On the other hand, Most JavaScript programs contain JavaScript statements . The statements are executed, one by one in the same order as they are written.
 We can see that , the statements are executed one by one and after statement 4 the result is executed.
Reference: https://eloquentjavascript.net/